FEW YEARS AGO

Saturday, June 9, 2012

Trying Photomatix Pro 4.2.2


If your camera offers Auto-Exposure Bracketing (AEB), select the Continuous Shooting mode, make sure the camera is set to Aperture Priority, and select an exposure increment of +/-2. The camera will automatically vary the shutter speed each time the shutter button is pressed, taking several exposures spaced by two-stop increments. I do, so I did:


LIGHT EXPOSURE ABOVE


DARK EXPOSURE NEXT, ABOVE.


...AND AS AEB DICTATES OUR MID-RANGE EXPOSURE ABOVE 


 Preprocess and merge the photos The next window lets you specify options for preprocessing and merging the photos. If your photos were taken hand-held (MINE WERE), check the Align source images box and select the By matching features method. The three photos of the Grand Canal were taken using a tripod, but we still check the alignment option to correct for small alignment problems that may happen even with a tripod. If your scene includes moving objects or people, check the Reduce ghosting artifacts option. The semi-manual option is recommended for better results. If the bracketed photos you loaded are RAW files, check the Reduce noise option with the on source images selected. You may also check this option
with jpeg or TIFF files. 


 ABOVE is what the HDR photomatix process produced, all-be-it my first real try at it. I wanted to compare the dark shot with some touch-up with iphoto as well plus no water marks, I liked it too. Was it better?, always subjective, was all this fun?, HECK YES! HERE IS THE OTHER SHOT TOUCHED WITH IPHOTO: 


Oh, What is it? A very young Apple Tree with apples and blooms on the same branch, is that normal apple people? I sure don't know but it is beautiful!


The Daguerreotype and the Beginnings of Photography


Fox Talbot Museum Curator Roger Watson talks about his love of the Daguerrotype and discusses who was the true inventor or photography. 'The Beginnings of Photography' is part of the Lives of the Great Photographers exhibition which showed at the National Media Museum, Bradford in 2011 The Lives of Great Photographers was a compelling new exhibition drawn exclusively from the Museum's extensive and diverse Photography Collection, including works from The Royal Photographic Society Collection and the Daily Herald Archive. Together this exhibition presents a selection of photographs by some of the greatest photographers of the nineteenth and twentieth centuries.

Friday, June 8, 2012

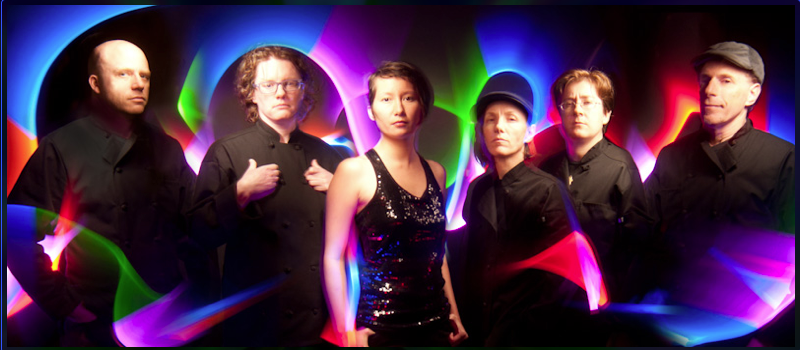
Light Painters Perform on America’s Got Talent


 Light painting photography is going more and more mainstream. A light painting photography team from San Francisco called the “Aurora Light Painters” recently auditioned for America’s Got Talent 2012 in Austin. It was quite a hit with the audience and judges alike. (via Laughing Squid)


 The Aurora Light Painters 

The Aurora Light Painters strive to create an incredible visual experience. Through the combined talents of the troupe they create hauntingly delightful visual vignettes. They are always pushing, adding and inventing new techniques to create shimmering and mysterious imagery. What is Light Painting Photography? Light painting is an innovative, and magical photographic technique. The images have a dreamlike futuristic feel. Who are we? We transformed the basement of Julian and Jackie's house into a Victorian parlor where an incredible number of fun and spooky effects were set up to delight the over 400 children who made their way through the experience. From interviews with a gloomy spirit down a haunted hall to a joke telling disembodied head, we found we had incredible fun working together on high artistic and highly technical projects. How did we become The Aurora Light Painters? Our Troop Leader, Julian Cash, is a renowned portrait photographer, who began light painting in childhood, and has made a career of it. Julian's 25+ years of experience in this medium were the original inspiration for our act. When Julian heard America's Got Talent were in town, he floated the idea forming a Light Painting troupe, and we enthusiastically agreed. Our original Aurora team consists of Julian Cash, Jackie Cash, Eso, Jett Atwood, Lisa Eller, and Ron Halbert. How Is It Done? We don't digitally create the images. The effects are created by "light painting" - that is, moving colored light in the dark. Light Painting as a technique has existed since the invention of the camera. The first photographers quickly discovered that a camera with an open shutter will show the path of light in a dark room. In the most famous example of this technique, a photojournalist handed Pablo Picasso a lightbulb and asked him to draw in the air. While several members of our troupe have light painted with both film and digital cameras for years, light painting with a digital video camera has only recently become possible. This hand-made aspect of our work is why we emphasise these are not simply "computer graphics". It takes quite a bit of effort and speed to make these pictures dance before your eyes. We hope that you enjoy seeing our images even half as much as we enjoy creating them in this exciting new medium!


Wednesday, June 6, 2012

A QUICK TRICK FOR FIGURING OUT WHICH OF YOUR EYES IS DOMINANT


One tip that instructors often pass onto the beginning photographers is to use their dominant eye (i.e. the eye they prefer seeing with) to look through the viewfinder.


 If you want to find out which of your eyes is the dominant one, here’s a quick test you can do: extend your arms straight out and form a small triangle with your hands. Looking through the triangle with both eyes open, frame something nearby (e.g. a doorknob) and place it in the center of the triangle. Then close your eyes one at a time without moving the triangle — your dominant eye is the one that placed the object in the center. Interestingly enough, many people (myself included) choose to use their right eye for their viewfinder even though the left one is dominant — likely because it’s the way they started shooting from the beginning. (via Reddit)


Friday, June 1, 2012

Ever Wonder What This Symbol on Your Camera Means?


Take a look at your camera, and there’s a good chance it’ll have this symbol: Φ — a small circle bisected by a long line that looks like a hieroglyph of Saturn. If you’ve always wondered what it means, today’s your lucky day: it’s called a film plane mark” (or “focal plane mark”, depending on who you ask), and indicates exactly where the film (or sensor) plane is inside the camera body. One reason the mark is useful is that macro photographers often want to determine the exact distance between their subject and the film plane, and the mark can make this calculation much easier.


Macro Photography Techniques


http://www.adorama.com/alc/article/Macro-Basics-AdoramaTV - Macro Photography Techniques and Tips - In this episode number 31, Mark will show you how to take those up close photos! Macro photography techniques allow unique opportunities to produce creative and dramatic photos and Mark shows us a couple examples. Macro Photography On Wiki: http://en.wikipedia.org/wiki/Macrophotography - "Quote" Macrophotography is close-up photography, usually of very small subjects. Classically a macrophotograph is one in which the size of the subject on the negative is greater than life size. However in modern use it refers to a finished photograph of a subject at greater than life size.[1] The ratio of the subject size on the film plane (or image sensor plane) to the actual subject size is known as the reproduction ratio. Likewise, a macro lens is classically one lens capable of reproduction ratios greater than 1:1, although it now refers to any lens with a large reproduction ratio, despite rarely exceeding 1:1. Outside of technical photography and film-based processes, where the size of the image on the negative or image sensor is the subject of discussion, the finished print or on-screen image more commonly lends a photograph its macro status. For example, when producing a 6×4 inch (15×10 cm) print using 135 format film or sensor, a life-size result is possible with a lens having only a 1:4 reproduction ratio. Reproduction ratios much greater than 1:1 are considered to be the realm of photomicroscopy, often achieved with digital microscope. "End quote" http://www.adorama.com/alc/article/Macro-Basics-AdoramaTV Macro Photography Techniques and Tips Category: Howto & Style Tags: macro photography techniques mark wallace digital photography macro lens Adorama AdoramaTV camera License: Standard YouTube License

Behind the Scenes - Yosemite Nature Notes - Moonbows – YOSEMITE NATIONAL PARK


Go behind the scenes with Yosemite Nature Notes producer Steven M. Bumgardner as he chases moonbows in Yosemite National Park.

Thursday, May 31, 2012

Google World Wonders Project takes you to Earth's treasures in glorious Street View vision


Google has already been taking us to exotic locations through Street View, but now it's hoping to enshrine the most famous places on Earth through the World Wonders Project, one car (or trike) at a time. A total of 132 sites, ranging from natural landmarks like Yosemite to much more synthetic constructions like the Leaning Tower of Pisa, have both an on-the-ground view as well as 3D renderings, videos and loads of history from UNESCO and the World Monuments Fund, among others. The educational bent is so conspicuous that Google is offering up some of the content in downloadable bundles for schools along with the usual web-based look. All of it promises a much more fascinating, hands-on approach than a dry textbook, and it's a unique way of bringing encyclopedic knowledge to an era of Chromebooks and the cloud. HOW IT IS DONE: